How to Migrate to .Net 5 without any hassles?

As 2020 came to an end, Microsoft announced their .Net 5 release along with a fixed schedule for release and support for future updates and EOLs. Going forward .Net, .Net Core, and Xamarin will be consolidated during the .Net 5 to .Net6 wave. This is likely to make the development process for Mobile, Web, and Desktop with .Net much more unified and easier. Here are some of the major highlights from a fairly beefy update:
  • .Net now supports single file applications that don’t necessitate for .Net to be on your machine. Now you can compile .Net in your application and get a small single file that you can copy to any machine.
  • One .Net means one SDK for mobile, web, desktop, and console.
  • Native support for ARM64 in .Net core
  • Smaller containers than ever before
  • Cross-platform Native UI

Migration Plan

As with any migration plan, first and foremost you need to be aware of everything that is not making it to the upgraded version. Earlier Core 2.0 borrowed some technologies from the .Net framework, that’s not the case with newer versions. Rather some things may be skipped in the new version for some technological reason or the other.
  • AssemblyLoadContext is replacing app domains, as the latter is quite an expensive runtime feature and not suitable for modern app development.
  • Remoting is being replaced by named pipes and gRPC
  • WebForms is being replaced by ASP.Net Blazor
  • WCF Server is being replaced by gRPC and Open source CoreWCF
  • WF is being replaced by Open source Corewf

How to Migrate your project to .Net 5

1. Ask if and why you need to migrate

The first step in migration is to understand the feasibility and goals for migration. No need to be over aggressive with the migration because .Net is not going anywhere. If you’re happy with how things are, then there is no need to migrate as .Net is part of Windows and is bound to get fixes for a considerably long period. On the other hand, if you want to innovate and leverage new features and technologies then .Net 5 is the way forward. Your migration approach will also depend on your choice of Operating System. If you’re sticking with the existing one or shifting to another. Pro Tip: Ensure that you have backups along the way so you can still ship working software. It’s futile to port in a big one-off migration. While it might work for small projects, not so much as your projects get bigger.

2. Analyze your app

Having worked months, even years on an app, one might think that they know the app inside out. It might be true for simple apps but in the case of complex projects, it’s easy to overlook obsolete things that might add to the difficulty of an already grueling undertaking. Things to keep in mind while auditing your app:
  • Use ApiPort to list outcode and its dependencies.
  • Legacy code can be a pain to carry forward. Analyze legacy code for feasibility if it seems obsolete and expensive to refactor then consider dropping before the port.
  • Analyze dependencies and ensure they have support for .net 5. If they are not supported then consider moving to modern alternatives before porting.

3. Convert Project

After understanding the needs for the port and deciding to ahead with it, you’ll need to convert your project. Conversion typically involves:
  • Replace packages.config with<packageReference> elements in the project
  • Another option would be to use Try-Convert to automate the process to migrate the project files to SDK style
Pro Tip: Consider only migrating the project files without changing the target framework as you’ll need click stops for big projects in case of unexpected downtime There are some limitations to Try-Convert method
  • It can’t convert some project types like ASP.NET and Xamarin
  • It doesn’t migrate any source code (*.cs), only project files(*.csproj)

4. Time to make the move

Replace the target framework string in the project file from the existing version to .Net 5. As stated earlier avoid moving everything at once you would want to start from the bottom with reusable libraries and make your way from there. Additionally, identify if you have shared components that need to continue to work on the existing .Net framework. Retarget those to .Net Standard and then retarget remainder to.Net 5.0

5. If you want to move to another OS

When you’re looking to change your operating system, ensure that you use a CI environment that can run your code in multiple operating systems. Azure DevOps, Github actions, etc. And last but not least, run tests to ensure that everything is working as expected. There are a lot of moving parts in an enterprise .Net project, and the scope for mistakes while porting is immense. It’s not a question of expertise but of time and resources. While the automated tools might make the process less of a pain but you’d still have to engage resources to make time-consuming changes in the source code. Currently handling numerous .Net projects, a few of which are under migration, Galaxy provides the needed expertise and resources to make the migration smoother with zero downtime. Contact us now for a free consultation on your .Net project.

When Should You Consider Outsourcing Software Development?

Outsourcing software development has been a strategic approach that has been adopted by many companies to not only fill in any technology gap but also to take advantage of lower pricing in offshore locations. Outsourcing is not a new approach and businesses have been dependent on it since the early 80s. Still, outsourcing is one of the most talked about business strategies and many still have their inhibitions and questions around whether to outsource, what are the benefits, what are the risks, when is the right time, how to find the right software development company, etc. In this article, we are going to talk about the benefits of outsourcing and when is the right time to outsource software development.

What are the key benefits of outsourcing software development?

Outsourcing is not just offloading your work to another company in an offshore location. There are many benefits of outsourcing software development –
  • Increased strategic focus on the core business functions: While the outsourcing partner is focusing on building your software product, businesses can focus on their core business functions including the growth areas.
  • Cost reduction: One of the benefits of outsourcing is cost reduction. If a business’ objective is to minimize software development costs, then there is no better option than a well-planned outsourcing.
  • Access to latest technology: If your business requires advanced and latest technology, then building such expertise in-house will be very expensive. This is where outsourcing to a specialized technology partner scores over in-house development. The outsourced company’s technology stack allows businesses to integrate state-of-the-art features and functionalities at fraction of a cost to develop these in-house.
  • Adjusting to project demand: Outsourcing provides benefits of adding scope and team members depending on the demand. Working with an in-house team has its challenges of scaling up or down quickly due to legal and regulatory issues regarding employment. Outsourcing provides business flexibility to scale the team up and down very quickly as per your software demands.
Outsourcing also has its fair share of challenges such as communication issues, cultural differences, improper project management, inability to handle big projects, etc. However, the benefits of a well-planned outsourcing strategy outweigh the challenges.

When outsourcing software development makes sense?

Outsourcing could play a strategic role in your business if you –
  • Need tech experts from global companies to supplement your in-house core team
  • Have hiring limitations due to lack of budget to hire in-house tech teams across different expertise such as design, development, QA, project managers, et al
  • Need to focus on your core business competencies rather than worrying about software development
  • Need to scale up the product after doing a prototype to test the market. Scaling up requires skilled resources across multiple teams such as server, security, maintenance, etc along with the usual development teams
  • Need to modernize the existing tech infrastructure with latest technologies

When to outsource? 

Once you have identified the need to outsource, the key question that needs to be addressed is when to outsource software development. Outsourcing makes sense for your business if –
  • Your region does not have the required skills or are unavailable due to existing demand scenario of such talent
  • Your team does not have additional bandwidth and hiring new resources is not a near-term option due to limitations around onboarding, employment challenges, etc
  • You have budgetary constraints around adding new resources to handle constantly changing technology stack
  • You are not able to focus on your core business competencies as management and monitoring of any project in-house is time consuming and challenging
  • You want a quick turnaround time and do not worry about hiring, training and other issues associated with in-house hiring. Most outsourced companies can start working on your projects right away, build an efficient roadmap and stick to strict deadlines to deliver your projects on schedule
  • You want to focus on costs. Outsourcing software development is an effective way to reduce overall development costs. This is mainly due to the pricing differential across different regions – Asia/Eastern Europe ($15-30/hour), South America ($30-$45/hour), North America ($80+/hour).

Conclusion

Outsourcing your software development needs is a tough decision involving many variables. Many businesses have been successful in outpacing their growth objectives and scaling up with the help of outsourced partners. A right software development partner can be a game-changer for your business. If you’ve any doubts related to software development and if you need assistance developing one then feel free talk to us here.

Creating forms in React – The Right Way!

In the world of web development, there are several front-end frameworks. Angular, Vue, React and a few others have gained immense popularity over the last few years. However, React has surpassed other frameworks in terms of popularity and demand:

React is used to build single-page applications and allows the creation of reusable UI components. Forms are an important component of React applications. They facilitate users’ interaction with the application. Some of the common use cases of forms are:

  • Login and Registration Forms
  • Contact Form
  • Checkout Forms
  • Create/Edit Order Forms
  • Adding or updating data into the application

It is virtually impossible to develop a React-based app without forms. At the very least, you will need it for the login and sign up screen, in case the data is retrieved.

In this article, we will share some best practices for creating forms in React. Let’s get started.

Forms using Controlled Components

We know that HTML elements like input remember what we type. Similarly, we can use the React component state to store data of forms. When the input data of forms elements is handled by the React component, it’s called a Controlled Component. Here, the only source of truth is a component state, not a DOM element.

Handling Forms

This describes how the data is handled when the value is changed or submitted. In HTML, the form data is usually handled by the DOM whereas, in React, components are used. When the data is handled by the components, it is stored in the component state.

Here is the code –

This is how one can collect the data from the user and get it right there in the React.

In the same way, if one wants to update the state, one can use the event handler “onChange”.

Now, to execute it, one can use the following code.

Conditional Rendering

If you do not want to display the h1 element until the user has made any input, you can add an if statement. Look at the example below and note the following:

1. Create an empty variable, in this example call it a header.

2. Add an if statement to insert content to the header variable if the user has done any input.

3. Insert the header variable in the output, using curly brackets.

Multiple Input Fields

You can control the values of more than one input field by adding a name attribute to each element. Here is how you can achieve this

  • When you initialize the state in the constructor, use the field names.
  • To access the fields in the event handler use the event.target.name and event.target.value syntax.
  • To update the state in the this.setState method, use square brackets [bracket notation] around the property name.

Validating Form Input

You can validate form input when the user is typing or you can wait until the form gets submitted.

Adding Error Message

Error messages in alert boxes can be a tad bit annoying! We recommend displaying the error when the user input is invalid.

Using React Hooks – Alternate Method

We can also handle the form state using React hooks. To do that we have useState() hook for storing state in a functional component. Let me explain this by creating a simple form with one input element and handle its data using a hook.

import React, { useState } from ‘react’; export default function ControlledFormWithHook() { const [name, setName] = useState(”); return ( <div> <form> <label>Name:</label> <input type=”text” onChange={(e) => setName(e.target.value)} /> </form> <br /> Name is: {name} </div> ); }

Here we have used a useState() hook to handle state.

Why use React-hooks-form?

One of the primary goals of React Hook Form is to reduce the amount of code that you have to write. As you can see from our final result, the React hooks form is elementary to use, and it takes a small amount of code.

Making The Right Choice

Forms are a crucial part of most web applications. It is imperative to know how to handle them, and fortunately, React provides a lot of ways to do just that.

For simple forms that don’t require heavy validations (or that can rely on HTML5 form validation controls), you can use the built-in state handling of the DOM given to us by default. There are quite a few things you can’t do (like programmatically changing the input values or live validation), but for the most straightforward cases (like a search field or a login field like above), you’ll probably get away with an alternative approach.

When you’re doing custom validation or need to access some form data before you submit the form, handling the state explicitly with controlled components is what you want. You can use regular useStateHooks, or build a custom Hook solution to simplify your code a bit.

Whatever you decide to use, handling forms in React has never been more straightforward than it is today. You can let the browser handle the simple forms while handling the state explicitly when the situation requires it. Either way – you’ll get the job done in fewer lines of code.

Contact Us right away to discuss your website or app development according to your business requirement and complexities.

About Galaxy Weblinks

We specialize in delivering end-to-end software design & development services and have hands-on experience with large, medium, and startup business development requirements. Our engineers also help in improving security, reliability, and features to make sure your business application scale and remain secure.

Craft CMS: Building the frontend of a website using Twig and GraphQL

Craft is a mature and tested content management system. Airbnb, W3C, Netflix, PBS, Salesforce, Moz, and countless other brands switched to Craft CMS for redesigning their websites. That for sure proves its credibility against other popular CMSs.

You can use Craft to design and develop complex and intuitive sites that rely heavily on PHP, databases, and query optimizations. However, you can also use Craft to design and develop simple sites where you do none of those things.

Craft CMS has ditched the traditional CMS systems that come with ready-to-go page templates, CSS frameworks, and pre-built themes. As a result, developers have a bespoke solution to build tier solutions. Craft CMS neither offers posts or pages or any bootstrap features and themes to build the frontend.

Craft CMS supports two distinctly different ways of building a front end:

Monolithic: building Twig templates for server-generated pages.

Headless: using a GraphQL API in combination with a separate front end codebase.

But before diving into these two frontend approaches, let’s find out what web developers, designers, and stakeholders love about Craft CMS.

Why Craft is a choice of many front-enders and website projects?

Both web designers and developers find Craft CMS features incredibly useful. Before installing any plugins, the options and functions developers have to work with are impressive. Here is a partial list of features and the reasons why Craft is preferred more for which many other CMSs require plugins:

  • It allows content managers to custom page layout building and preview updates in real-time.
  • One can manage all of their brand sites under one roof, whether it’s a multi-site, multilingual, or both. This is a major problem area with the majority of other CMSs.
  • With virtually no learning curve, the UI of the Craft control panel is very intuitive.
  • Craft is fast for the front end as well as the Control Panel and tops the many reasons for choosing a modern CMS over an older one.
  • Robust sitewide content indexing and search capabilities.
  • Robust custom fields for full control over your design and content.
  • Nearly all content is in one place: Entries. Editors love this and can easily find what they’re looking for.
  • Fine-grained user permissions and group management allow publishing workflows across different departments and individuals. And no, you don’t need a plugin for this.

Building frontend with Craft CMS using Twig templates

Twig is a template engine for PHP so instead of writing PHP you write in this simple Twig syntax.

Some developers are not keen on this, but Craft uses Twig as its template engine. The word “use” should be highlighted as a requirement, as there is no option of writing raw PHP anywhere inside the template.

It is standardized in a way that, when you look at your team’s Pull Requests, you probably don’t expect to see 100 lines of custom PHP that make no sense. You only see the code related to templates.

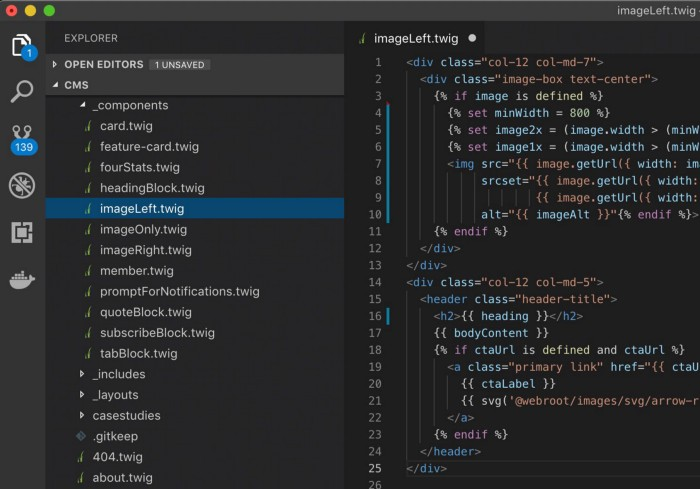
Apart from this, Twig makes it easy to “component-ize” your elements. This way you define the markup and layout for a component once, then reuse it throughout your site and pass variables.

You can define components for different content modules like image left, image right, headings, cards, etc. This ensures you’re consistent, reuse the same components throughout the site, and reduce duplicate code.

image code

Here’s how to use GraphQL + Craft CMS as a ​“head­less” CMS

Let’s say you’re not digging Twig or you would rather use one of the latest technologies (hello static site generators!). Craft’s templating system isn’t the only way to get content out of Craft. As of Craft 3.3, it provides a “headless” mode and GraphQL built-in with Craft’s Pro features.

That means you can use tools like Gatsby or Gridsome to build static sites with the comfort of Craft CMS. That brings Craft in line with the likes of WordPress that provides its REST API for fetching content to use somewhere else.

As a web devel­op­er, you’d use GraphQL if you were writ­ing a fron­tend that is sep­a­rate from the back­end. You’d be using Craft CMS as a ​“head­less” CMS for its excel­lent con­tent author­ing experience.

Per­haps you’re writ­ing the fron­tend in a frame­work like Svelte, Vue.js, React, or one of the frame­works that lay­ers on top of them like Grid­some, Gats­by, Nuxt.js, or Next.js. You could write a cus­tom API for Craft CMS using the Ele­ment API, but that can be a sig­nif­i­cant amount of work, and you’ll end up with some­thing bou­tique, rather than an indus­try standard.

This is where GraphQL for Craft CMS excels. By cre­at­ing your con­tent mod­els in Craft CMS, you auto­mat­i­cal­ly get a GraphQL API to access it, with no extra work on your part.

Conclusion

Craft abstracts all the field creation and setup to the admin panel. You only need to point it to the right Twig template and then use the fields you connected. Furthermore, it provides localization and multi-site management out of the box with no need for plugins.

The bottom line is Craft is an open-source, modern, affordable CMS with stellar security and first-party support. The features and flexibility it offers out of the box, along with its content-first approach, make it go-to for nearly every custom web project.

About Galaxy Weblinks:

We are your offshore CMS development partner! We offer expert capabilities in developing feature-rich solutions using the latest CMS technology trends. We have hands-on experience in CMS solutions like Craft, WordPress, Drupal for different business needs. We offer assistance from building custom CMS websites to website migration and maintenance processes.

Best Automation Testing Tools For Visual QA

Where did the submit button vanish?

Why is there an overlapping of text? 

Is the button size right for smaller screens? 

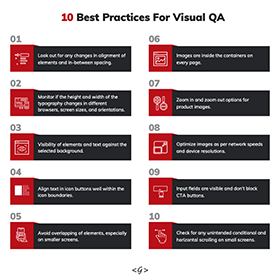
Visual QA can save you from numerous uncomfortable situations. Furthermore, to contribute to an already back-breaking pressure of nearing deadlines, these questions are often raised at the worst possible times, mostly post-launch of your website/ app. 

For the what, why, and when on Visual QA (used interchangeably with Design QA), read this blog. In this article, we focus on the methodologies and tools to be used for successful visual QA testing. 

There are two methods of visual QA testing, manual and automated testing. 

Manual Visual Testing 

Deploying human resources for looking for any visual inconsistencies and discrepancies across varying screen combinations is manual visual testing. It is a time-consuming, and error-prone process that requires a decent team size. However, the scope here is huge in comparison to automated testing. 

One should opt for manual testing when UI is believed to be unstable and needs human intervention. As you grow, manual testing becomes more difficult as the combination of operating systems, screen sizes, orientations, and browsers keep on increasing. 

Automated Visual Testing

Automated visual testing utilizes software to detect any visual discrepancies in the UI. It is quicker in comparison but the investment in selected software can be expensive. Even if one goes for open source tech, you will need the expertise to handle the same or train your existing team as per the selected software. 

Like mentioned earlier, the scope is limited to a defined set of issues and areas. At times what looks good to the software is not the same for the human eye. But once the trial and error phase is over, automated visual testing can save a lot of time and effort for your QA team. 

Having said that, let’s take a look at some of the tools and open source technologies for automated visual testing. 

Percy 

Percy is a power-packed automated visual testing tool. There is an option to integrate, execute, and audit the test results. Once the integration is complete via CI/CD services or frameworks, you can start the execution of your UI components. The tool takes the UI screenshots from various browsers, screen sizes, and does a pixel by pixel comparison with the selected baseline for any UI inconsistencies.  

Selenium 

Selenium is an open-source platform that supports many programming languages like Java, C#, Python, Javascript, Ruby, etc. The written tests can be run here and it handles the interaction with browsers. The tool grants great support for all visual tests and the software also generates screenshots of various web pages. With Selenium IDE, you can record actions that will be utilized for future references.    

Screener.io

All your records and test executions can be carried out in real-time, thanks to cloud computing. There is no coding required for the automation of your test flows. Your test coverage is more here as visual testing and functional testing can be done in a single test run. The visual testing components can be combined with performance testing. This helps immensely in the development cycle. If you use Storybook for your UI components, you need not worry about its testing as Screener supports storybook component testing too. 

Gemini

An open-source tool, Gemini can be run via Selenium or PhantomJS server. You can test different sections, as well as visual differences in the element sizes and positions. There are test suites that you can use without worrying too much about the coding. Another plus point is that the interface is not complicated, thus making it easy to use.  

Visual

Get on board with a dedicated QA team, contact us here, and we will get in touch. 

About us 
Our team of IT specialists has 20 years of industry experience in building and optimizing applications and websites. We strive to offer solutions for all our clients, be it design, development, or QA services.

How to Choose the Right Shopify Development Partner?

Ecommerce has been growing at a swift pace along with the several platforms such as Shopify over which these websites are built. Building your company’s online Shopify store is similar to building your new house and choosing the right Shopify development company is very crucial. There are a lot of moving parts to analyze, design, plan and set up. While setting up a Shopify store is easy, but making sure that your visitors have a good user experience is crucial for the success of your Ecommerce website. This is where the right Shopify development team can understand your requirements and help your business grow. In this article, we discuss the need for a Shopify development team and highlight a few important considerations that will help you make the right selection.

Why should you hire a Shopify development team?

Once you have decided to develop an Ecommerce website, there are plenty of things for you to worry about including getting your product-market fit right, sourcing products, managing inventory, preparing a marketing strategy, etc. Developing a Shopify platform and adding it to your list of priority things takes your crucial time away from the other important considerations that are needed to grow your business. This is where an expert Shopify development team helps you free up your time while handling the development aspects of your ecommerce website. We have listed below a few considerations why there is a need for a Shopify development team.
  • Saves your time so that you can focus on your core business objectives
  • Helps you with customized Shopify design and development for your Ecommerce website
  • Has relevant technical expertise working with CRMs, API integration, SEO optimization, page speed optimization, inventory management, email marketing solutions, etc.
  • Saves you cost if outsourced in comparison to building an in-house team
  • Helps you focus on building the right Ecommerce website that targets your business objectives such as increasing sales, maximizing conversions, enhancing user experience, etc.

How to choose the right Shopify development partner?

Once you have decided to hire a Shopify development team, the key considerations in selecting the right partner are –
  • Alignment
The Shopify development vendor should understand your business requirements, help focus on priorities, advice from a technical perspective, and execute work efficiently.
  • Expertise 
It is crucial that your Shopify development team has in-depth knowledge of the Shopify platform and its versions. The team should have required programming skill sets, have experience working with APIs integration, have expertise in building and integrating custom Shopify apps and themes, deep knowledge of database technologies for storage and information management, etc. A good approach to evaluate their expertise is to ask about a few of their Shopify project portfolio and speak to a few of their references.
  • Best Practices
A gap in understanding of the requirements can cause the complete failure of your project. Hence, it is important that the Shopify development company follows best industry practices across communications, execution, documentation, budgeting, quality assurance, security, etc. Project management methods can vary greatly between companies and for a successful engagement with a company, it is crucial that they follow a process that is organised, consistent, and supports quality control. For offshore partners, good communications is a must to understand requirements correctly and efficiently coordinate for smooth and timely execution. In order to better understand their best practices, you should discuss your project needs and evaluate how they plan to execute the development process.
  • Pricing
Cheapest isn’t the best option while selecting a Shopify development vendor, so always look at the bigger picture. Never pick a vendor purely on the basis of their rate. Rather look at the approach they came to the pricing. The best way is to review a few proposals and compare the project plans and time estimates for each phase. Understand the no. of hours, resources each vendor is proposing, and then compare their total costs. Additionally, most vendors provide support/maintenance services, and their pricing can vary. Look at the monthly support hours each vendor is proposing and at what cost. The company should handle all crucial issues for you such as version upgrades, security patch installations, bug fixing, design updates, customization, plugin integrations, performance enhancements, etc.

Conclusion

Running a successful Shopify Ecommerce website in today’s highly competitive online environment requires a good development partner who understands your business requirements and provides a helping hand in realizing your company’s vision, achieving your growth plans and having a great user experience. If you’ve any doubts related to Ecommerce platforms and if you need assistance developing one, then feel free to talk to us here.

Leveraging MVP For Your Business

MVP is your product idea with the bare necessary features that you will test with real users. Feedback received from this stage will then be used for developing your actual product. The response from your MVP sets the direction of your product and answers essential questions like:
  • Is your idea marketable?
  • Will the users pay for your idea in the future?
  • Does your MVP solve the problem as you anticipated it?
  • What additional features users expect in your product?
Your MVP gives a reality check of the viability of your product, hence it’s vital not to skip it.

Why is MVP necessary?  

To further elaborate on the importance of MVP and to convince anyone who says otherwise, reason with them with the points below:
  • An MVP lets you test a basic product before it goes for design and development stages, thereby saving you time and effort.
  • Helps you in identifying a group of early adopters for future testing.
  • Is cost-effective viability and feasibility check.
  • Gives you insight into user expectations concerning your product.

When does MVP come into play? 

The obvious answer here is right after the ideation of your product. However, there are times when you take the MVP route apart from this. If you wish to venture into a new category in your existing product. For example, you are an online bakery shop with great reach and wish to leverage your brand to diversify offerings. You are thinking of including frozen food in your product offerings. You need to see if there is a separate website to be developed or you can integrate the new products into the existing one. If you wish to revamp your older website with a new design and improved UI. There will be a new color scheme, different navigation, basically a complete makeover. You can create an MVP for both scenarios to see your response. Your existing customer base can be reached out for their inputs on the new MVPs and give their feedback on whether your vision is being reflected in the new design. So the scope of MVP is not restricted to just a new product, it can be for:
  • New features
  • Different design
  • Introducing your product to newer demographics

Which MVP model to go for?

The decision to build an MVP of your product is not complete yet. You need to select which MVP  model is feasible for you to build with the available resources and timeline. Here are the most popular ones.

Landing page MVP

You create a landing page with the basics:
  • A description of your product
  • How is it different from your competitors, i.e. your USP
  • A CTA button can be added for signing up for newsletters, more content about your product, contact information, etc.
Buffer went with the landing page MVP. Google Ads helped Joe Gascoigne got 120 sign-ups and was able to talk to many of them to get their thoughts on his product and what they liked the most about it.

Explainer videos MVP 

In this, you create a video, preferably a short one that describes your product and a demo of your product in action. You will need access to your audience, via their email IDs, or targeted ads. Animated videos can also be created here. Videos are known for higher engagement rates when compared to text, so you have a chance of creating a buzz on social media as well. Dropbox’s four-minute-long video went viral, and they got the attention of the potential users within a short period, thanks to the video.

Wizard of Oz MVP

This is the “Fake it till you make it” scenario! In this, the customer interacts with your product thinking that it’s the final one. But in the background, a person will be handling the responses to your customer. The tasks performed by your team will eventually be done by certain algorithms or automated technology. But before you invest your time in that, you wish to see if users need it. Plus you get user responses this way that will act as the base for your future assumptions. Jeff Bezos similarly launched Amazon from his garage.

Concierge MVP

Concierge MVP is helping your users manually to achieve their end goals. Every customer that visits you, will be guided by a human resource. Via this method, you get a one on one conversation with your real users and understand their pain points. It’s testing the waters yourself! You interact with your users and incorporate their feedback to your original idea. This doesn’t necessarily mean that you need to develop a complete prototype to test as you are present to guide your users. Airbnb started similarly. Joe Gebbia and Brian Chesky tested if people were willing to stay in houses and build a website around the same concept and three people signed up.

Email MVP

The starter pack for this method is an email list and a good response rate from the same list. Sending a product via email is way more convenient than building a website. However, a good click rate is a must, otherwise, your emails are of no use due to lack of feedback. An existing user base can be helpful here as they are familiar with your product and brand. They will be more willing to spare a few minutes as opposed to shooting emails to strangers. A lack of response can lead to a dead-end here, so it must be avoided at all costs. Ryan Hoover’s Product Hunt received a huge response from the emails he sent and could thus leverage that for creating a successful platform. Everything said, skipping an MVP is never a good start. Numerous options can be taken to see the viability of your product. They vary as per resource availability, timeline, and tech friendliness. If you think that developing an MVP involves a lot of work, call us, and we will make the MVP journey smooth for you. About us  We specialize in delivering end-to-end software design & development services. Our digital product experts are creative problem-solvers with a decade of experience in all facets of digital and interactive design and development. We create compelling and human-focused web and mobile experiences delivered through clean, and minimalistic UI.

How to decide what’s the right tech stack for your Mobile/Web App?

Choosing the best technology to build a robust solution is a very crucial decision. This is the third step while planning mobile and web application development. It comes after establishing the business perspective and product structure. With large companies, in-house and offshore developers typically make the choice collaboratively. It’s more complicated if you’re a small startup.

The decision will generally decide whether your mobile and web application will perform well and be scalable. It will also impact your budget! A well-chosen tech stack gives a competitive advantage and helps it grow, whereas the wrong technology can set you back by months.

This article will give you insights on things you need to know about the tech stack, and some clues for making smart decisions when the time comes.

Differences Between Web and Mobile App Tech Stack

What is a tech stack anyway? Bluntly put, it’s a set of software tools, databases, frameworks, programming languages, and technologies that are used to build a mobile, web app, or a website.

Web applications are generally internet-enabled. Thus, users don’t have to download them to access it. Web app tech stack uses the resources provided by the system. In this way, to build a web app, you will need to use a combination of front-end and back-end technologies.

Mobile apps are created for a specific mobile platform, i.e. a particular environment and cannot be replicated to another environment. To use a mobile app, the user should download it from the app/play store. Thus, apart from front-end and back-end technologies, to build a mobile app, you should use platform-oriented technologies – Swift and Objective-C for iOS and Java or Kotlin for Android app development.

Front-end technologies include:

  • HTML/HTML5
  • CSS
  • JavaScript
  • UI-frameworks and libraries: ReactJS, AngularJS, React, jQuery, and others

HTML and CSS Toolkit

There are several frameworks used for CSS and HTML. Some of them include:

  • Pure
  • Materialize
  • Susy
  • Bootstrap
  • UIkit
  • Bulma
  • Foundation

Popular choices among them are Foundation and Bootstrap. While Foundation is ideal for developing nimble, responsive websites, Bootstrap uses HTML, CSS, and jQuery library to make responsive web pages,

JavaScript Frameworks For Front-End Development

Modern web applications use JavaScript in the front-end. We have listed the best frontend frameworks to use in 2021 for web and mobile applications.

Back-end technologies include:

  • Operating system
  • Web server: Apache, Nginx
  • Databases: Neo4j, MySQL, Oracle, PostgreSQL, Microsoft SQL Server, and others
  • Programming languages:  Objective-C, Python, PHP, Java, C#, and others
  • Cloud infrastructures and services: AWS, Heroku, Google Cloud, Microsoft Azure, and others.
  • Various frameworks build over programming languages: Django, .NET, Node.js, and others;

Once again, we have listed the best backend frameworks to use in 2021 that you may use.

Here are a few types of popular back-end tech stack combinations used mostly:

LAMP Stack

The LAMP stack helps in building an environment for running PHP applications. It’s used for hosting websites on Linux. The stack is made up of the following technologies: Linux (the environments OS), Apache (the HTTP server), MySQL (the database), and PHP (the server-side programming language).

Wins Stack

Windows Internet Naming Service (Wins) is another back-end stack that consists of a Windows server, internet information services, .Net, and Microsoft SQL Server. It’s a system that is used to determine the IP address associated with a particular network computer.

MEAN Stack

The mean stack consists of MongoDB, Express.js, Angular, and Node.js. It is more of a full-stack structure. It‘s an open-source JavaScript software stack for building dynamic websites and web applications.

Xampp Stack

Xampp toolkit consists of X, Apache, MySQL or MariaDB, PHP, Perl. AMP stack lets you install Apache, MySQL, and PHP on your computer together with some other useful software. It’s designed to provide you an easy installation experience.

MERN Stack

MERN consists, MongoDB, Express, React/Redux, and Node.js. The MERN stack is very similar to the MEAN stack. This stack is sought after because of the growth in popularity of ReactJS in front-end development and NodeJS in back-end development and is useful for building high-end single-page applications.

Choosing the right Tech Stack | 11 must-know things

Your choice of technology stack should be based primarily on the quality and functional requirements you want to have in your app or website. If that tech stack can develop all the desired features and functions you want, then, it’s the right choice.

The Size & Complexity of the Project

One of the key factors to watch out for is the size of your project. The tech stack needed for a mid-sized or even large project will vary from that needed for a small project. Besides the size, the complexity of the project also matters a lot. Complex projects ask for thorough technologies and tools.

The Product Functionality and Specification 

You need to be sure that your defined functionalities should solve the problems of your target audience. It makes sense to run this step after or along with market research to find out what products already exist and what additional specifications your software needs to have to beat the competition. According to this, you will be able to choose your right set of tools.

Products’ Required Speed and Functions

It goes forward to double-check the compatibility and efficiency rate of pairing a project and tech stack. Here, the functions, and speed expected with the project is supposed to deliver to its users well, which goes a long way in determining which tech stack to use.

System Load Requirements

This is another very important aspect to pay attention to. Several projects have different processing loads and therefore not all tech stacks can serve all processing load requirements. With this, you will need to compare your prospective product processing loads with the capacity of the tech stack to ensure that it can meet that need.

Clearly defined requirements for MVP

MVP is the imperative to the mobile & web application development process of a product. As a bare-bones set of crucial elements, MVP is generally designed for experimental proof of the competitiveness and viability of the product in a real market situation. Thus, it’s essential to understand what matters to an app right from the start and what technologies will be needed in the future.

Scalability Requirements

It’s essential to understand that there are two types of scalability — horizontal and vertical.

Horizontal scalability means the capability of running on more devices. Vertical scalability helps in adding more elements to an application. Both are equally important for the growth and efficient operation of the product.

The tech stack you choose should be able to support your app as it scales up. When you are ready to enhance your productivity, your tech stack should be equipped with the right tools, frameworks, and aspects that would step up the process without wasting time or money. As the app landscape is dominated by MVP models, your stack should be able to support upgrade and scalability at various stages after the launch of a prototype without complicating things.

Performance Requirements

The influence of performance stats comes from two sources. One from the business requirement and the other is what the technology is capable of in a situation.

Performance requirements determine how fast the system can react and how many requests the system can process at what rate. Since the whole operation must react to thousands of events at millisecond speed – it makes sense to pick the most reliable option.

Costs

Budgeting the tech stack is probably the trickiest thing in the entire development process. Why? Well, software development is not precisely writing on a piece of paper with a pencil — it demands a significant financial resource to get the job done. There are:

  • Subsequent maintenance costs
  • Technology education & licensing fees
  • Developers’ salaries
  • Hosting costs for keeping the product

The trick is to avoid overspending wherever possible, avoid bloating, and balance things out.

DevOps & security requirement

The kind of DevOps practices you are used to, as well as the level of the security requirement, is a crucial factor, too. Will your app just serve as an informational hub for end-users or your app will manage their financial data?

If you need to manage user data, security is of paramount importance and hence, you should also consider choosing a tech stack that always facilitates a high-end security framework to fulfill app development goals.

Maintenance

The Tech stack should be easy to manage without lengthy codes. If your tech stack confuses your developers with complex codes and takes a long time to process and complete a task, then you might get stuck after a point in development.

At the same time, choosing a stack that has a very illegible coding structure can lead to additional spending on training and development of resources. So, your focus should be on finding a tech stack on which code is easy to maintain for your development team.

Seek out professional guidance

If you are new to the world of application tech stacks, then seeking out the help of an IT professional is a good idea. These professionals will be able to provide the guidance needed to get the best tech stack components.

Conclusion

These are the essential things you need to know about Tech Stack as a concept and how it affects the development of a project and defines its prospects.

With these tips, you will be able to navigate in the vast sea of options, not get caught in the shuffle, or lose sight of your goals.

Contact Us right away to discuss your website or app development tech stack according to your business requirement and complexities.

About Galaxy Weblinks

We specialize in delivering end-to-end software design & development services and have hands-on experience with large, medium, and startup business development requirements. Our engineers also help in improving security, reliability, and features to make sure your business application scale and remain secure.

A lowdown of PHP 8.0 update

The latest major update in PHP 8 has been made available to the public. It’s a typical three-year cycle version upgrade of PHP. Comes with a few radical alterations, so there’s a high chance you’ll need to make a few changes in code before upgrading. Some of the major features and optimizations introduced in this update are named arguments, union types, attributes, constructor property promotion, match expression, nullsafe operator, JIT, and improvements in the type system, error handling, and consistency. Here’s a lowdown of the official update announcement:

PHP 8 Named arguments

// PHP 7 htmlspecialchars($string, ENT_COMPAT | ENT_HTML401, ‘UTF-8’, false); // PHP 8 // Specify only required parameters, skipping optional ones. // Arguments are order-independent and self-documented. htmlspecialchars($string, double_encode: false);

PHP 8 Attributes

Instead of PHPDoc annotations, you can now use structured metadata with PHP’s native syntax. // PHP 7 class PostsController { /** * @Route(“/api/posts/{id}”, methods={“GET”}) */ public function get($id) { /* … */ } } // PHP 8 class PostsController { #[Route(“/api/posts/{id}”, methods: [“GET”])] public function get($id) { /* … */ } }

PHP 8 Constructor property promotion

Less boilerplate code to define and initialize properties. // PHP 7 class Point { public float $x; public float $y; public float $z; public function __construct( float $x = 0.0, float $y = 0.0, float $z = 0.0, ) { $this->x = $x; $this->y = $y; $this->z = $z; } } // PHP 8 class Point { public function __construct( public float $x = 0.0, public float $y = 0.0, public float $z = 0.0, ) {} }

PHP 8 Union types

Instead of PHPDoc annotations for a combination of types, you can use native union type declarations that are validated at runtime. // PHP 7 class Number { /** @var int|float */ private $number; /** * @param float|int $number */ public function __construct($number) { $this->number = $number; } } new Number(‘NaN’); // Ok // PHP 8 class Number { public function __construct( private int|float $number ) {} } new Number(‘NaN’); // TypeError

PHP 8 Nullsafe operator

In the latest version you can use a chain of calls with the new nullsafe operator instead if null check conditions. In case of chain failure, the execution of the entire chain aborts, and the entire chain evaluates to null. // PHP 7 $country =  null; if ($session !== null) { $user = $session->user; if ($user !== null) { $address = $user->getAddress(); if ($address !== null) { $country = $address->country; } } } // PHP 8 $country = $session?->user?->getAddress()?->country;

PHP 8 Match expression

The new match is similar to switch and has the following features: Match is an expression, meaning its result can be stored in a variable or returned. Match branches only support single-line expressions and do not need a break; statement. Match does strict comparisons. // PHP 7 switch (8.0) { case ‘8.0’: $result = “Oh no!”; break; case 8.0: $result = “This is what I expected”; break; } echo $result; //> Oh no! // PHP 8 echo match (8.0) { ‘8.0’ => “Oh no!”, 8.0 => “This is what I expected”, }; //> This is what I expected Since the update has breaking changes, it’s advisable to have experts help you with the migration to avoid any unexpected downtime. We have a team of experts that’s well versed in PHP. Get in touch with us here if you’re looking for a quick and hassle-free upgrade.

Native or Hybrid app: What to Choose?

Today the majority of companies are increasingly using digital products to address industry-specific challenges, for instance, enhance customer loyalty and experience, automate reporting, boost sales, or improve document management.

But mobile app development is an expensive investment. When you want one for your business, the next big question is ‘which development approach to choose for building the mobile app?’.

So, if you are wondering whether you should take the native or hybrid route for creating your next mobile application, you’ll find this article extremely useful.

We’ve decided to compare these two options to help you understand what will be the best one for your project. The critical differentiators we’ve discussed here considering both the options will help you while developing a new application.

Let’s get started!

What is a native app?

A native mobile application is a smartphone program, which is coded in a specific programming language like Java and Kotlin for Android or Swift and Objective-C for iOS.

This type of digital solution offers a higher level of performance and reliability. Installed directly from stores (Google Play, App Store), native apps generally have access to the camera, a list of contacts, microphone, GPS, and other things on a device.

What is a hybrid application?

A hybrid app is a software program that uses elements of both native and website applications. To develop Hybrid you use HTML, CSS, and JavaScript, these are then wrapped in the Native application using a wrapper like Xamarin or Apache Cordova, or React Native.

In recent years, hybrid applications have been growing in popularity. Through using the same user interface, they can be built and released across multiple different platforms. To put it even simpler, this is the same app that can be installed from Google Play and App Store.

What should you choose: Native or hybrid apps?

Before we jumpstart with the comparisons, here are a few questions you must think about and ask yourself first that will help you make the right choice: -Do you want to amaze your users by building an entirely native application that integrates into the platform of their choice (Android or iOS)?; Do you want to be able to tap into a user’s device functions i.e. camera, GPS, etc. to make a feature-rich and customized application?

Or

-Are you more interested in taking an MVP approach, and quickly developing a hybrid application that can be released across platforms?; Do you foresee future updates and changes that are done automatically?

Comparing Native and Hybrid Applications

Codebase

The most important characteristic of a native mobile application is that it has different codebases for each OS – iOS and Android.

Created using HTML, CSS, and JavaScript (like websites), hybrid solutions enable developers to write a single codebase. On top of that, the app can be run on all devices regardless of OS.

Native: a separate codebase for each OS

Hybrid: a single codebase

When you require a native app development, you may need a separate development team for each platform, leading to increased development costs. With this, you might need to consider that you have in-depth knowledge and understanding of specific programming languages for each platform.

Performance

Though native application development is more time-consuming, it is faster and more reliable by its very design than a hybrid one.

A hybrid app has only a wrapper that is downloaded to the user’s phone (which may or may not contain all the navigational elements) with most of the data being loaded from the server.

In contrast, as users navigate a native mobile app, the visual elements, structure, and contents are already on their phone, available for instant loading, and thereby providing a seamless experience.

Native: High

Hybrid: Moderate! Can be higher with extra efforts in the development phase

This characteristic is crucial when it comes to apps that have to ensure instant response to user actions, provide high availability through handling peak loads, even with a slow Internet connection.

User Experience (UX)

Native applications offer the best UX compared to all other types of apps. The user experience specifically for a particular OS becomes critically important to the mobile presence in the market.

To offer a good UX with a hybrid app, you would need the most brilliant user experience architect/developer that can truly build an app that caters to the two dominant user types: Android users and iPhone users, as their style guidelines are simply too different.

Native: Great

Hybrid: Good

So, in both cases, the application’s controls, interactions, visual cues, and gestures must be seamlessly integrated with your platform’s extensive style guide.

Mobile application development cost and time

Different codebases have to be written for each platform, and therefore, a native product takes more time. This also implies the team extension, which means the involvement of iOS and Android engineers.

Whereas, making a hybrid app is less time-consuming and needs less effort, which is a great advantage.

Native: High

Hybrid: Easier and faster to develop

If your programmers are fluent in several languages, libraries, and frameworks, this will reduce the time and price of building any project. Further customizations will be possible to be made, and you can also choose to release only an Android or iOS application.

Security

Enhanced security is one of the key benefits of native mobile apps over others. They enable software developers to integrate various functions such as two-factor authentication that help ensure data safety and privacy.

Whereas, a Hybrid app always has some Native code (for instance to start a Web container like a WebView). That does make them susceptible to vulnerabilities that affect web browsers and those that affect native apps.

Native: Enhanced

Hybrid: Good

Essentially, there is more work involved in securing your hybrid application, but just as much is involved in maintaining native ones.

Conclusion

The battle between hybrid apps and native apps is never going to end because there’s a place and need for both.

Ultimately, to make the best decision for you, you need to measure the benefits each one offers and evaluate them against your goals.

Contact us, if you want to discuss your business application idea. We will help you through the entire process of launching an app, and help you understand the benefits of both the approaches that fit your business needs.

About Galaxy Weblinks

We specialize in delivering end-to-end software design & development services and have hands-on experience with native, hybrid, cross-platform, PWA development. Our engineers also help in improving security, reliability, and features to make sure your business application scale and remain secure.